Piapi Mcp Server

Erstellt vonapinetworkapinetwork

Eine TypeScript-Implementierung eines Model Context Protocol (MCP) Servers, der mit der API von PiAPI integriert ist. PiAPI ermöglicht es Benutzern, Medieninhalte direkt von Claude oder anderen MCP-kompatiblen Apps mit Midjourney/Flux/Kling/LumaLabs/Udio/Chrip/Trellis zu generieren.

Übersicht

Was ist der PiAPI MCP Server?

Der ### PiAPI MCP Server ist eine TypeScript-Implementierung eines Model Context Protocol (MCP) Servers, der nahtlos mit der API von PiAPI integriert ist. Dieser innovative Server ermöglicht es Benutzern, Medieninhalte über verschiedene Plattformen wie Midjourney, Flux, Kling, LumaLabs, Udio, Chirp und Trellis direkt von Claude oder anderen MCP-kompatiblen Anwendungen zu generieren. Er fungiert als Brücke zwischen Benutzerbefehlen und den Medienerzeugungsfähigkeiten dieser Plattformen, verbessert das Benutzererlebnis und optimiert die Inhaltserstellung.

Funktionen des PiAPI MCP Servers

  • TypeScript-Implementierung: Entwickelt mit TypeScript, was Typensicherheit und bessere Entwicklungspraktiken gewährleistet.
  • MCP-Kompatibilität: Vollständig konform mit dem Model Context Protocol, was eine einfache Integration mit anderen MCP-kompatiblen Anwendungen ermöglicht.
  • Unterstützung mehrerer Plattformen: Unterstützt eine Vielzahl von Medienerzeugungsplattformen, die es Benutzern ermöglichen, Inhalte über verschiedene Dienste hinweg zu erstellen.
  • Benutzerfreundliche Schnittstelle: Mit Blick auf die Benutzerfreundlichkeit gestaltet, sodass Benutzer Medieninhalte ohne umfangreiche technische Kenntnisse einfach generieren können.
  • Open Source: Als öffentliches Repository verfügbar, was Entwicklern ermöglicht, zur Funktionalität des Servers beizutragen, ihn zu modifizieren und zu verbessern.

So verwenden Sie den PiAPI MCP Server

  1. Installation: Klonen Sie das Repository von GitHub und installieren Sie die erforderlichen Abhängigkeiten mit npm oder yarn.

    git clone https://github.com/apinetwork/piapi-mcp-server.git
    cd piapi-mcp-server
    npm install
    
  2. Konfiguration: Richten Sie Ihre API-Schlüssel und Konfigurationseinstellungen in der bereitgestellten Konfigurationsdatei ein, um eine Verbindung zu den gewünschten Medienerzeugungsplattformen herzustellen.

  3. Server starten: Starten Sie den Server mit dem Befehl:

    npm start
    
  4. Anfragen stellen: Verwenden Sie die von dem Server bereitgestellten API-Endpunkte, um Anfragen zur Medienerzeugung zu senden. Stellen Sie sicher, dass Ihre Anfragen den MCP-Spezifikationen entsprechen.

  5. Integration: Integrieren Sie den Server in Ihre MCP-kompatiblen Anwendungen, um mit der Medieninhaltsgenerierung zu beginnen.

Häufig gestellte Fragen

F1: Was ist der Zweck des PiAPI MCP Servers?

A1: Der PiAPI MCP Server fungiert als Vermittler zwischen Benutzern und verschiedenen Medienerzeugungsplattformen und ermöglicht eine effiziente Inhaltserstellung über eine einheitliche API.

F2: Ist der PiAPI MCP Server kostenlos zu verwenden?

A2: Ja, der PiAPI MCP Server ist Open Source und kostenlos auf GitHub verfügbar.

F3: Kann ich zum PiAPI MCP Server beitragen?

A3: Absolut! Beiträge sind willkommen. Sie können das Repository forken, Änderungen vornehmen und einen Pull-Request einreichen.

F4: Mit welchen Plattformen kann ich Medieninhalte generieren?

A4: Der Server unterstützt mehrere Plattformen, darunter Midjourney, Flux, Kling, LumaLabs, Udio, Chirp und Trellis.

F5: Wie kann ich Probleme melden oder Funktionen anfordern?

A5: Sie können Probleme melden oder Funktionen anfordern, indem Sie ein Issue im GitHub-Repository eröffnen.

Durch die Nutzung des PiAPI MCP Servers können Benutzer ihre Medienerzeugungsprozesse optimieren und ihre kreativen Arbeitsabläufe über verschiedene Plattformen hinweg verbessern.

Detail

piapi-mcp-server

Website Documentation Discord

A TypeScript implementation of a Model Context Protocol (MCP) server that integrates with PiAPI's API. PiAPI makes user able to generate media content with Midjourney/Flux/Kling/LumaLabs/Udio/Chrip/Trellis directly from Claude or any other MCP-compatible apps.

<a href="https://glama.ai/mcp/servers/ywvke8xruo"><img width="380" height="200" src="https://glama.ai/mcp/servers/ywvke8xruo/badge" alt="PiAPI-Server MCP server" /></a>

Features (more coming soon)

Note: Time-consuming tools like video generation may not complete due to Claude's timeout limitations

  • Base Image toolkit
  • Base Video toolkit
  • Flux Image generation from text/image prompt
  • Hunyuan Video generation from text/image prompt
  • Skyreels Video generation from image prompt
  • Wan Video generation from text/image prompt
  • MMAudio Music generation from video
  • TTS Zero-Shot voice generation
  • Midjourney Image generation
    • imagine
    • other
  • Kling Video and Effects generation
  • Luma Dream Machine video generation
  • Suno Music generation
  • Suno Lyrics generation
  • Udio Music and Lyrics generation
  • Trellis 3D model generation from image
  • Workflow planning inside LLMs

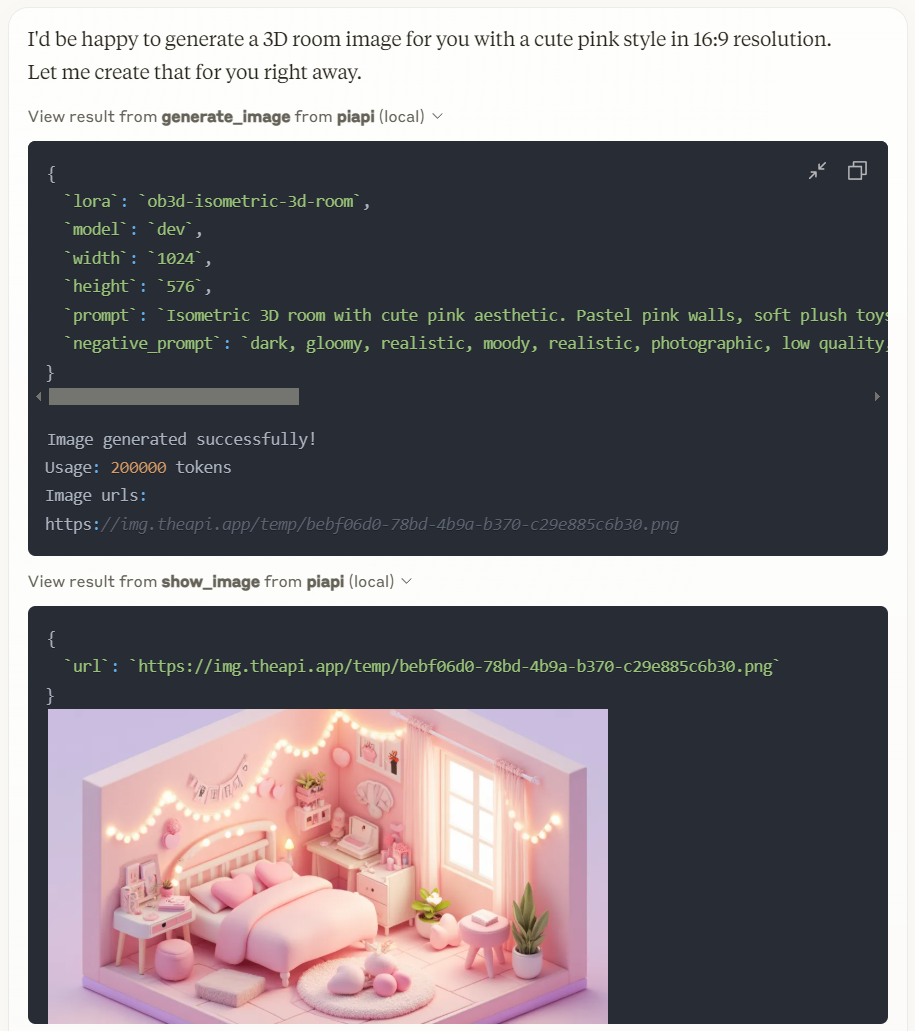
Working with Claude Desktop Example

image

Prerequisites

  • Node.js 16.x or higher
  • npm or yarn
  • A PiAPI API key (get one at piapi.ai)

Installation

  1. Clone the repository:
git clone https://github.com/apinetwork/piapi-mcp-server
cd piapi-mcp-server
  1. Install dependencies:
npm install
  1. Build the project:
npm run build

After building, a dist/index.js file will be generated. You can then configure this file with Claude Desktop and other applications. For detailed configuration instructions, please refer to the Usage section.

  1. (Optional) Test server with MCP Inspector:

First, create a .env file in the project root directory with your API key:

PIAPI_API_KEY=your_api_key_here

Then run the following command to start the MCP Inspector:

npm run inspect

After running the command, MCP Inspector will be available at http://localhost:5173 (default port: 5173). Open this URL in your browser to start testing. The default timeout for inspector operations is 10000ms (10 seconds), which may not be sufficient for image generation tasks. It's recommended to increase the timeout when testing image generation or other time-consuming operations. You can adjust the timeout by adding a timeout parameter to the URL, for example: http://localhost:5173?timeout=60000 (sets timeout to 60 seconds)

The MCP Inspector is a powerful development tool that helps you test and debug your MCP server implementation. Key features include:

  • Interactive Testing: Test your server's functions directly through a web interface
  • Real-time Feedback: See immediate results of your function calls and any errors that occur
  • Request/Response Inspection: View detailed information about requests and responses
  • Function Documentation: Browse available functions and their parameters
  • Custom Parameters: Set custom timeout values and other configuration options
  • History Tracking: Keep track of your previous function calls and their results

For detailed information about using the MCP Inspector and its features, visit the official MCP documentation.

Usage

Connecting to Claude Desktop

Add this to your Claude Desktop configuration file (~/Library/Application Support/Claude/claude_desktop_config.json on macOS or %APPDATA%\Claude\claude_desktop_config.json on Windows):

{
  "mcpServers": {
    "piapi": {
      "command": "node",
      "args": ["/absolute/path/to/piapi-mcp-server/dist/index.js"],
      "env": {
        "PIAPI_API_KEY": "your_api_key_here"
      }
    }
  }
}

After updating your configuration file, you need to restart Claude for Desktop. Upon restarting, you should see a hammer icon in the bottom right corner of the input box. For more detailed information, visit the official MCP documentation

Connecting to Cursor

Note: Following guide is based on Cursor 0.47.5. Features and behaviors may vary in different versions.

To configure the MCP server:

  1. Navigate to: File > Preferences > Cursor Settings, or use the shortcut key Ctrl+Shift+J
  2. Select "MCP" tab on the left panel
  3. Click "Add new global MCP server" button in the top right
  4. Add your configuration in the opened mcp.json file
{
  "mcpServers": {
    "piapi": {
      "command": "node",
      "args": ["/absolute/path/to/piapi-mcp-server/dist/index.js"],
      "env": {
        "PIAPI_API_KEY": "your_api_key_here"
      }
    }
  }
}
  1. After configuration, you'll see a "piapi" entry in MCP Servers page
  2. Click the Refresh button on the entry or restart Cursor to connect to the piapi server

To test the piapi image generation:

  1. Open and select "Agent mode" in Cursor Chat, or use the shortcut key Ctrl+I
  2. Enter a test prompt, for example: "generate image of a dog"
  3. The image will be generated based on your prompt using piapi server

To disable the piapi server:

  1. Navigate to the MCP Servers page in Cursor Settings
  2. Find the "piapi" entry in the server list
  3. Click the "Enabled" toggle button to switch it to "Disabled"

Development

Project Structure

piapi-mcp-server/
├── assets/
├── src/
│   ├── index.ts        # Main server entry point
├── package.json
├── tsconfig.json
└── .env.example

License

MIT

Serverkonfiguration

{
  "mcpServers": {
    "piapi-mcp-server": {
      "command": "docker",
      "args": [
        "run",
        "-i",
        "--rm",
        "ghcr.io/metorial/mcp-container--apinetwork--piapi-mcp-server--piapi-mcp-server",
        "node dist/index.js"
      ],
      "env": {
        "PIAPI_API_KEY": "piapi-api-key"
      }
    }
  }
}

Projektinfo

Autor
apinetwork
Erstellt am
Jul 21, 2025
Stern
53
Sprache
TypeScript
Tags
-

Piapi Mcp Server Alternative

Für einige Alternativen zu Piapi Mcp Server bieten wir dir passende Seiten nach Kategorie sortiert.

APISIX Modell Kontextprotokoll (MCP) Server wird verwendet, um große Sprachmodelle (LLMs) mit der APISIX Admin API zu verbinden.

MCP-Server, der Claude die Fähigkeit gibt, die GPT-Assistenten von OpenAI zu nutzen.

Ein MCP-Server, der andere MCP-Server für Sie installiert.
MCP-Server für den AI-Agent-Marktplatz-Index von DeepNLP

Mehr anzeigen >>